DIY Projects
-
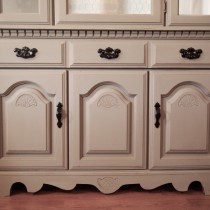
1 Drawer 2 Door Accent Cabinet
The lovely 1 Drawer 2 Door Accent Cabinet is brimming with charm and will become a treasured accent in any room you set it in. The distressed details and duck egg colour finish give this lovely design a touch of character while the patine accents corners on the drawer fronts and chic decorative hardware give it elegant…
-
DIY Simple Console Table
So hubby and I are working on an upcoming project for a dear friend and I wanted to test out some stain colours before using it on the piece itself. What better way but to build something useful! I’ve been wanting a console table for a space in my foyer but could never find something…
-

DIY Burlap Xmas Wreath
Sunday Fun-day!! What better way is there to spend time inside on this lovely snowy day… My dear friend Jenny brought back a few styrofoam rim spacers from her work to make some DIY projects and wreath. I couldn’t resist when she offered me one. You can actually buy the wire frames form Michaels or…
-
Custom grey Side Tables
Today, I’d like to share the side/night tables makeover I’ve just completed. For this project, I had some left over French Linen and Paris grey ASCP paint that I’ve combined. The resulting colour was just gorgeous. The original handles were a brassy/copper worn-out colour just I just had hubby spray paint them in black. What…
-
Duck Egg & Chicken Wire Display Cabinet
Rustic? Antique? Duck Egg & Chicken wire??? A combination perfect for a beautiful display cabinet. This little piece was picked up at an auction last winter. The glass pane was missing and it looked in dire need of a make over. With a little bit of elbow grease, some chicken wire, installed by hubby-extraordinaire and…
-
Antique Royal Oak Tall Boy
It’s been a while since I’ve posted. The last few months have been pretty hectic. Hubby and I moved to the country, north of the GTA and we’ve never been happier. Yes, the commute to work is a little longer but coming home every day is like going to the cottage. The air is cleaner,…
-
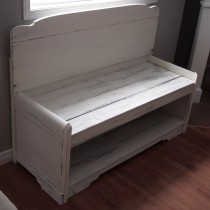
Repurposed Headboard turned into bench
So I’ve always wanted to tackle the headboard repurposed into bench project. Luckily, I married a wonderful handy-man who loves to help with my projects. We’ve picked up this old but still very solid headboard and it sat in the garage for a while waiting for some inspiration. Hubby picked up some 2×4’s and started…
-
Furniture & Galvanized chicken wire?
So now that the nice weather is here, I don’t quite spend much time indoors working on pieces. Although I’ve had this urge to do a piece with chicken wire after seeing it done time and time again on Pinterest. It just gives the right amount of rustic and a charm to any pieces… and…
-
Reclaimed Wood Wall art
Ever wondered what to hang in your dining room? Our house has super high vaulted ceilings and finding art pieces that fit our decor and style was really difficult or ridiculously overpriced. I browsed the Home Senses, Winners and the likes but could never find something that I liked at an affordable price. So why…
-

Old Frames + Burlap
The Nursery project was so much fun to do for these awesome friends that I had to make them a little thank you gift. There’s this Napoleon Bonaparte quote that I love and think is beautiful for a little girl and I’ve been dying to add it in a project somehow. Everyone has really old…
This site is no longer being maintained